Install Nodejs on Ubuntu

Copy from: https://tecadmin.net/how-to-install-nvm-on-ubuntu-22-04/

Installing NVM on Ubuntu

sudo apt install curl curl https://raw.githubusercontent.com/creationix/nvm/master/install.sh | bash

sudo apt install curl 

curl https://raw.githubusercontent.com/creationix/nvm/master/install.sh | bash

source ~/.profile 

nvm install 14.21.3  

Install PostgreSQL in Ubuntu

Copy from

https://linuxhint.com/install-and-setup-postgresql-database-ubuntu-22-04/

https://hassanannajjar.medium.com/how-to-fix-error-password-authentication-failed-for-the-user-in-postgresql-896e1fd880dc

if maybe someone like me overlook the filename that must be edit

in my case the conf file located at

/etc/postgresql/14/main'

if you type cd /etc/postgresql/14/main

so just sudo nano  add these 2 filenames

  1. postgresql.conf

listen_addresses = '*'

uncomment this line and change localhost to *

  1. pg_hba.conf

host all all 0.0.0.0/0 trust

change the 127.0.0.1/32 change to 0.0.0.0/0

last don’t forget to restart using sudo service postgresql restart

I hope this one clears the notification error

Uninstall

sudo apt-get --purge remove postgresql postgresql-*
dpkg -l | grep postgres

Reset Password postgres

sudo -u postgres psql postgres

# \password postgres

Enter new password: 

Restore Database

sudo -i -u postgres
psql -U postgres -d tdsp_db -f test_db_backup.sql

How To Install Node.js on Ubuntu 20.04

Copy from: https://www.digitalocean.com/community/tutorials/how-to-install-node-js-on-ubuntu-20-04

Option 3 — Installing Node Using the Node Version Manager

Another way of installing Node.js that is particularly flexible is to use nvm, the Node Version Manager. This piece of software allows you to install and maintain many different independent versions of Node.js, and their associated Node packages, at the same time.

To install NVM on your Ubuntu 20.04 machine, visit the project’s GitHub page. Copy the curl command from the README file that displays on the main page. This will get you the most recent version of the installation script.

Before piping the command through to bash, it is always a good idea to audit the script to make sure it isn’t doing anything you don’t agree with. You can do that by removing the | bash segment at the end of the curl command:

curl -o- https://raw.githubusercontent.com/nvm-sh/nvm/v0.39.3/install.sh

Copy

Review the script and make sure you are comfortable with the changes it is making. When you are satisfied, run the command again with | bash appended at the end. The URL you use will change depending on the latest version of nvm, but as of right now, the script can be downloaded and executed with the following:

curl -o- https://raw.githubusercontent.com/nvm-sh/nvm/v0.39.3/install.sh | bash

Copy

This will install the nvm script to your user account. To use it, you must first source your .bashrc file:

source ~/.bashrc

Copy

Now, you can ask NVM which versions of Node are available:

nvm list-remote

Copy

Output. . .
        v18.0.0
        v18.1.0
        v18.2.0
        v18.3.0
        v18.4.0
        v18.5.0
        v18.6.0
        v18.7.0
        v18.8.0
        v18.9.0
        v18.9.1
       v18.10.0
       v18.11.0
       v18.12.0   (LTS: Hydrogen)
       v18.12.1   (LTS: Hydrogen)
       v18.13.0   (Latest LTS: Hydrogen)
        v19.0.0
        v19.0.1
        v19.1.0
        v19.2.0
        v19.3.0
        v19.4.0

It’s a very long list. You can install a version of Node by writing in any of the release versions listed. For instance, to get version v14.10.0, you can run:

nvm install v14.10.0

Copy

You can view the different versions you have installed by listing them:

nvm list

Output->     v14.10.0
       v14.21.2
default -> v14.10.0
iojs -> N/A (default)
unstable -> N/A (default)
node -> stable (-> v14.21.2) (default)
stable -> 14.21 (-> v14.21.2) (default)
. . .

This shows the currently active version on the first line (-> v14.10.0), followed by some named aliases and the versions that those aliases point to.

Note: if you also have a version of Node.js installed through apt, you may receive a system entry here. You can always activate the system-installed version of Node using nvm use system.

Additionally, there are aliases for the various long-term support (or LTS) releases of Node:

Outputlts/* -> lts/hydrogen (-> N/A)
lts/argon -> v4.9.1 (-> N/A)
lts/boron -> v6.17.1 (-> N/A)
lts/carbon -> v8.17.0 (-> N/A)
lts/dubnium -> v10.24.1 (-> N/A)
lts/erbium -> v12.22.12 (-> N/A)
lts/fermium -> v14.21.2
lts/gallium -> v16.19.0 (-> N/A)
lts/hydrogen -> v18.13.0 (-> N/A)

You can install a release based on these aliases as well. For instance, to install the latest long-term support version, hydrogen, run the following:

nvm install lts/hydrogen

Copy

OutputDownloading and installing node v18.13.0...
. . .
Now using node v18.13.0 (npm v8.19.3)

You can switch between installed versions with nvm use:

nvm use v14.10.0

Copy

OutputNow using node v14.10.0 (npm v6.14.8)
```

You can verify that the install was successful using the same technique from the other sections:

```command
node -v

Outputv14.10.0

The correct version of Node is installed on your machine as expected. A compatible version of npm is also available.
Downgrade PHP 8.0 to 7.4 on Ubuntu

Copy from https://hostappraiser.com/downgrade-php-8-0-to-7-4-on-ubuntu/

Use update-alternatives –config php

The first way to accomplish this is by issuing the following command

sudo update-alternatives --config php

This will give you a listing as shown below

sudo update-alternatives --config php
There are 2 choices for the alternative php (providing /usr/bin/php).

  Selection    Path             Priority   Status
------------------------------------------------------------
* 0            /usr/bin/php8.0   80        auto mode
  1            /usr/bin/php7.4   74        manual mode
  2            /usr/bin/php8.0   80        manual mode

Press <enter> to keep the current choice[*], or type selection number: 1
update-alternatives: using /usr/bin/php7.4 to provide /usr/bin/php (php) in manual mode

As you can see I entered the number 1 to select version 7.4. Then did a quick check to validate the change.

php -v
PHP 7.4.25 (cli) (built: Oct 22 2021 12:33:59) ( NTS )
Copyright (c) The PHP Group
Zend Engine v3.4.0, Copyright (c) Zend Technologies
    with Zend OPcache v7.4.25, Copyright (c), by Zend Technologies

Let’s restart apache2 s our changes will take effect.

sudo systemctl restart apache2

Use a2enmod to enable 7.4

First, add the repo and update apt.

sudo add-apt-repository ppa:ondrej/phpsudo
apt-get update

Then we will install PHP 7.4 and the extension needed. Depending on your setup you may not need all the extensions listed.

sudo apt-get installphp7.4sudoapt-get installphp7.4-cli php7.4-common php7.4-json php7.4-opcache php7.4-mysql php7.4-mbstring  php7.4-zip php7.4-fpm php7.4-intl php7.4-simplexml

Then we will disable the PHP 8.0 module by removing those symlinks. Then enable PHP 7.4 by using a2enmod.

sudo a2dismod php8.0
sudo a2enmod php7.4

Let’s restart apache2 s our changes will take effect.

sudo systemctl restart apache2

Now to set an alternative name path we will use these commands

sudo update-alternatives --set php /usr/bin/php7.4
sudo update-alternatives --set phar /usr/bin/phar7.4
sudo update-alternatives --set phar.phar /usr/bin/phar.phar7.4
sudo update-alternatives --set phpize /usr/bin/phpize7.4
sudo update-alternatives --set php-config /usr/bin/php-config7.4

I hope you find this helpful!

How To Convert Crosstab Table (2-Dimensional Table) To List In Excel?

Copy from : https://www.extendoffice.com/documents/excel/705-excel-convert-table-to-list.html

Convert Cross Table To List In Excel With VBA

The following VBA macro can help you quickly convert all cross tables in active worksheet to flat lists.

Step 1: Hold down the Alt + F11 keys in Excel, and it opens the Microsoft Visual Basic for Applications window.

Step 2: Click Insert > Module, and paste the following macro in the Module Window.

The VBA on transpose crosstab table to list:

Sub ConvertTableToList()
Const TEST_COLUMN As String = “A”
Dim i As Long, j As Long
Dim iLastRow As Long
Dim iLastCol As Long
Application.ScreenUpdating = False
With ActiveSheet
iLastRow = .Cells(.Rows.Count, TEST_COLUMN).End(xlUp).Row
For i = iLastRow To 2 Step -1
iLastCol = .Cells(i, .Columns.Count).End(xlToLeft).Column
For j = iLastCol To 3 Step -1
.Rows(i + 1).Insert
.Cells(i + 1, 2).Value = .Cells(i, j).Value
.Cells(i, j).Value = “”
Next j
Next i
.Rows(1).Delete
End With
Application.ScreenUpdating = True
End Sub

Step 3: Click the F5 key to run this macro.

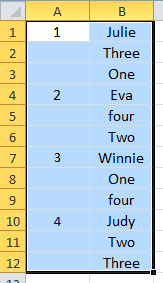
Then you will see the converted list showing as following screenshot:

Note:

1. This VBA macro loses some data of original table, such as headers, or others. In this case, the headers (Name, Grade, and Class) are lost.

2. You can change As String = “A”, to meet your need. For example, if the cross table is stated in Column E, you should instead “E” of “A”.

3. And if there are other data in the worksheet, sometimes the data in the list will be wrong after converting a cross table.

Deploy a VueJS web app with nginx on Ubuntu

By: Chi Thuc Nguye

on https://thucnc.medium.com/deploy-a-vuejs-web-app-with-nginx-on-ubuntu-18-04-f93860219030

Installing Node JS

We use nvm (Node Version Manager) for easy Node JS version switching later if needed.

Install or update nvm

curl -o- https://raw.githubusercontent.com/creationix/nvm/v0.34.0/install.sh | bash

Restart your terminal or source ~/.bashrc for required environment variables, then check installed nvm version:

$ nvm --version
0.34.0

Install Node JS

Install Node JS with nvm is as easy as following:

nvm install node

Here, node is an alias for the latest version of Node JS.

To install a specific version of node:

nvm install 6.14.4 # or 10.10.0, 8.9.1, etc.

List all installed Node JS versions:

$ nvm ls
v8.15.0
-> v11.10.0
default -> node (-> v11.10.0)
node -> stable (-> v11.10.0) (default)
stable -> 11.10 (-> v11.10.0) (default)
iojs -> N/A (default)
unstable -> N/A (default)
lts/* -> lts/dubnium (-> N/A)
lts/argon -> v4.9.1 (-> N/A)
lts/boron -> v6.16.0 (-> N/A)
lts/carbon -> v8.15.0
lts/dubnium -> v10.15.1 (-> N/A)

List all Node versions available:

nvm ls-remote

Switch nvm version:

$ nvm use 8.15.0
Now using node v8.15.0 (npm v6.4.1)

Build VueJS project

cd {project_folder}
npm install

then

npm run build

After successful installation, you should have a dist folder, to which you will point your web root.

Install and configure nginx

Install nginx

sudo apt install nginx

Double check to make sure the nginx service is running with command service nginx status, then open your browser and enter url http://{server_ip}, you should see some welcome message from nginx.

Configure nginx

sudo touch /etc/nginx/sites-available/vue_project
sudo ln -s /etc/nginx/sites-available/vue_project /etc/nginx/sites-enabled/vue_project
sudo vim /etc/nginx/sites-available/vue_project

Sample configuration:

server {
listen 80;
server_name example.com; charset utf-8;
root {{app_root}}/dist;
index index.html index.htm; # Always serve index.html for any request
location / {
root {{app_root}}/dist;
try_files $uri /index.html;
} error_log /var/log/nginx/vue-app-error.log;
access_log /var/log/nginx/vue-app-access.log;
}

Check configuration, then restart nginx:

sudo nginx -t
sudo service nginx restart

Now, you should access your api through port 80 with your domain name: http://example.com.

Making Laravel Passport work with Lumen

Copy from https://github.com/dusterio/lumen-passport and https://github.com/dusterio/lumen-passport/issues/136

You need to create a config file for auth services as config/auth.php:

<?php

return [
    'defaults' => [
        'guard'     => 'api',
        'passwords' => 'users',
    ],

    'guards' => [
        'api' => [
            'driver'   => 'passport',
            'provider' => 'users',
        ],
    ],

    'providers' => [
        'users' => [
            'driver' => 'eloquent',
            'model'  => \App\User::class
        ]
    ]
];

And after register this on bootstrap/app.php:

$app->configure('auth');

If you are using Lumen 7+, insert this on bootstrap/app.php also:

$app = new \Dusterio\LumenPassport\Lumen7Application(
    dirname(__DIR__)
);

So, refresh the database and run passport:install again

php artisan migrate:fresh
php artisan passport:install

This worked for me

How to completely uninstall Android Studio on Mac?

Copy from https://stackoverflow.com/questions/17625622/how-to-completely-uninstall-android-studio-on-mac

# Deletes the Android Studio application
# Note that this may be different depending on what you named the application as, or whether you downloaded the preview version
rm -Rf /Applications/Android\ Studio.app
# Delete All Android Studio related preferences
# The asterisk here should target all folders/files beginning with the string before it
rm -Rf ~/Library/Preferences/Google/AndroidStudio*
# Deletes the Android Studio's plist file
rm -Rf ~/Library/Preferences/com.google.android.*
# Deletes the Android Emulator's plist file
rm -Rf ~/Library/Preferences/com.android.*
# Deletes mainly plugins (or at least according to what mine (Edric) contains)
rm -Rf ~/Library/Application\ Support/Google/AndroidStudio*
# Deletes all logs that Android Studio outputs
rm -Rf ~/Library/Logs/Google/AndroidStudio*
# Deletes Android Studio's caches
rm -Rf ~/Library/Caches/Google/AndroidStudio*
# Deletes older versions of Android Studio
rm -Rf ~/.AndroidStudio*
rm -Rf /Applications/Android\ Studio.app
rm -Rf ~/Library/Preferences/Google/AndroidStudio*
rm -Rf ~/Library/Preferences/com.google.android.*
rm -Rf ~/Library/Preferences/com.android.*
rm -Rf ~/Library/Application\ Support/Google/AndroidStudio*
rm -Rf ~/Library/Logs/Google/AndroidStudio*
rm -Rf ~/Library/Caches/Google/AndroidStudio*
rm -Rf ~/.AndroidStudio*